eSuite Administrator
This section provides the setup necessary to use the Human Resources eBenefits section of the eSuite portal.
The Batch Management page allows administrators to enable benefit open enrollment batches so that employees may enroll in them through eSuite. When you select this option from the eHR > eBenefits menu, you will see a screen like the following:
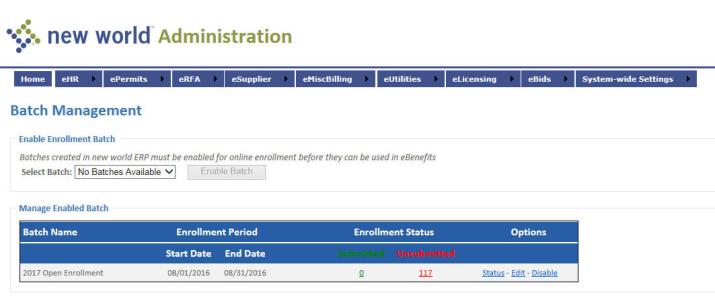
Note: Only active enrollment batches in new world ERP will appear here.
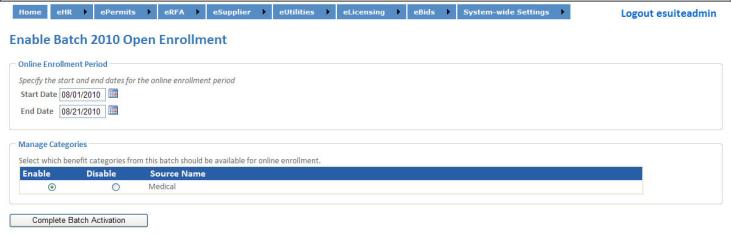
Click Enable Batch to start the process. You will see a screen like the following:

Select the Start Date and End Date for the enrollment period. The batch will be available for online enrollment only during this date range.
Select the benefit categories that should be included in this batch. Click Complete Batch Activation to activate the batch. It will now be available to be managed as needed.
Status
The Status link on the Status page launches the Employee Enrollment Status for Batch page. It allows the administrator to view the status of employees at a glance.
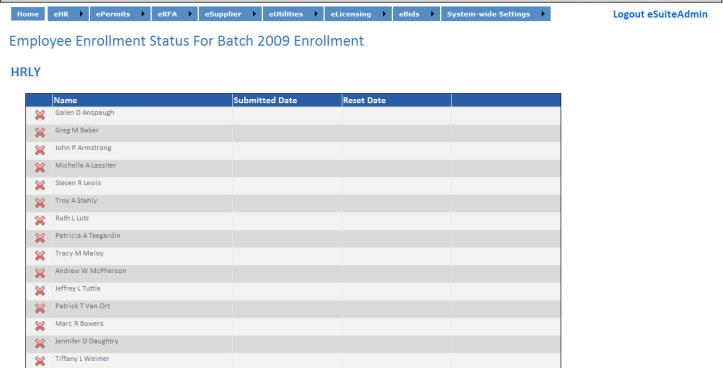
Employees are grouped by their benefit groups. When an employee enrolls in the batch, the Submitted Date and Reset Date will display in the row with the employee’s name.
The Reset Enrollment link appears for employees who have submitted their enrollment. To reset the employee’s enrollment, click the link. The Reset Enrollment link no longer displays, and the first column in the employee row will display a red X. The employee will then need to resubmit his enrollment for the batch.
Edit
The Edit option opens the batch management edit wizard. Step 1 of the batch wizard does not apply in edit mode, since a batch does not need to be selected to be enabled.
This option allows you to enable and disable benefit categories for the currently selected batch.
Select the Enable or Disable option as needed to change the settings for benefits. “Category not supported” will display if the setting may not be changed.
Select Complete Batch Activation to continue.
Disable
The Disable link on the Status page can be used to remove the batch as an option once the enrollment period is closed.

Click Yes to disable the batch. If you do not want to disable the batch at this time, click No, and you will be returned to the Batch Maintenance option.
The Content Configuration menu option launches a content management page. It allows the administrator to define custom text in different areas of the eBenefits module for the current batch.
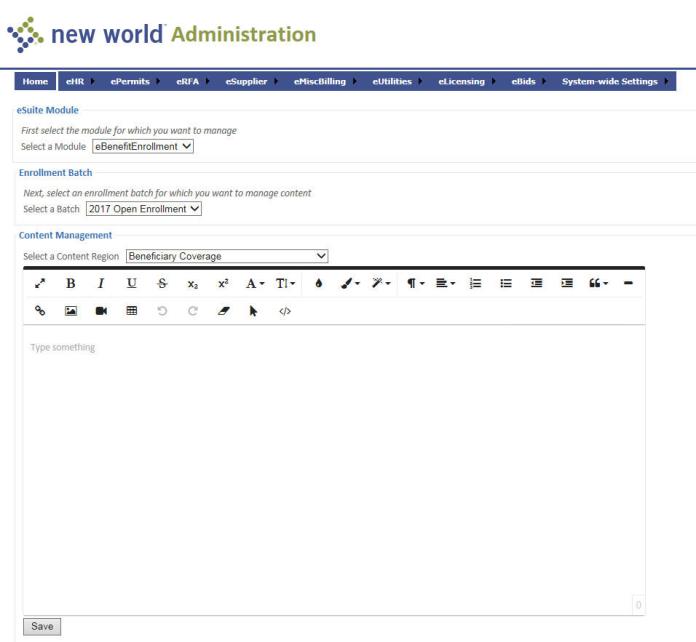
The Select a Module field defaults to eBenefitEnrollment; use this value.
The Select Batch field displays only when the Select a Module value is eBenefitEnrollment. Select the benefit enrollment batch for which you will define content.
Select a Content Region for which you want to define text. The options displayed in this field are determined by the module you selected above.
In the text editor below the Select a Content Region field, enter the text that will appear for the content region you specified. Text can be entered either in a design view (like typing a regular document) or in an HTML view (that shows the formatting tags).
Click Save to store the custom content.
Repeat Steps 1 through 5 for any other areas to which you want to add custom text.
The Manage Plan Documentation page allows administrators to add and maintain documents for enrollment batches. When you select this option from the eHR > eBenefits menu, you will see a screen like the following:
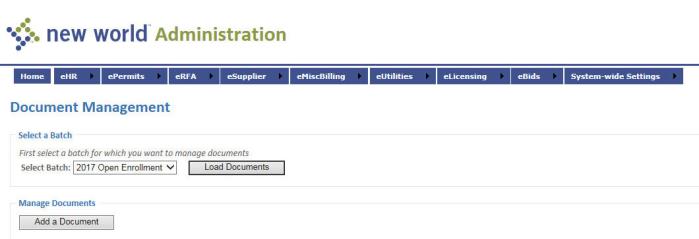
Use the Select Batch field to choose the batch you want to work with.
Click Load Documents. All of the documents currently tied to the batch will display in the Manage Documents section.
Add/Edit Documents
Use the Add a Document button or the edit link to work with a document. Selecting either option will launch the Plan Document page:
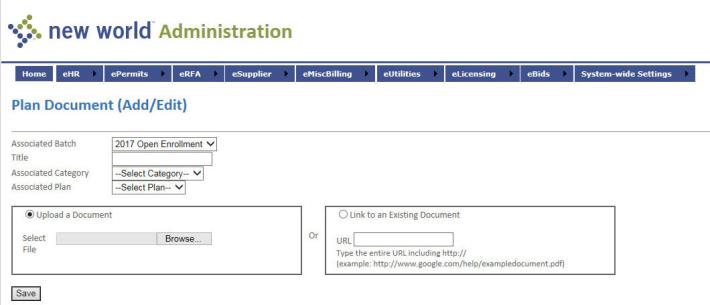
Note: Documents can be attached at the Batch level, the Batch/Category level, or the Batch/Category/Plan level.
The Associated Batch field contains all open batches. This value is required. Select the batch to which this document should apply.
Enter the Title of the document. This value is required. The value you enter will appear in the grid on the Plan Documentation Maintenance page.
Select the Associated Category to which this document should apply. The options are all the benefit categories that have been defined. This selection ties the document to the specific benefit category (e.g., Health, Dental, etc.) for this batch.
Once the Associated Category is selected, the Associated Plan field drop-down will be populated with all plans defined for that benefit category. Select the plan to which the document should apply. This ties the document to a specific benefit plan (e.g., BCBS) within the category selected above for this batch.
If the document exists on your network, use the Upload a Document option. Use the Browse button to select the file you want to associate.
If the document exists on the Internet, use the Link to an Existing Document option. Type or copy and paste the entire URL into the URL field.
Click Save to associate the document.
This section provides the setup necessary to use the Human Resources eEmployee section of the eSuite portal.
The Content Configuration menu option launches a content management page. It allows the administrator to define custom text in different areas of the eEmployee module for the current batch.
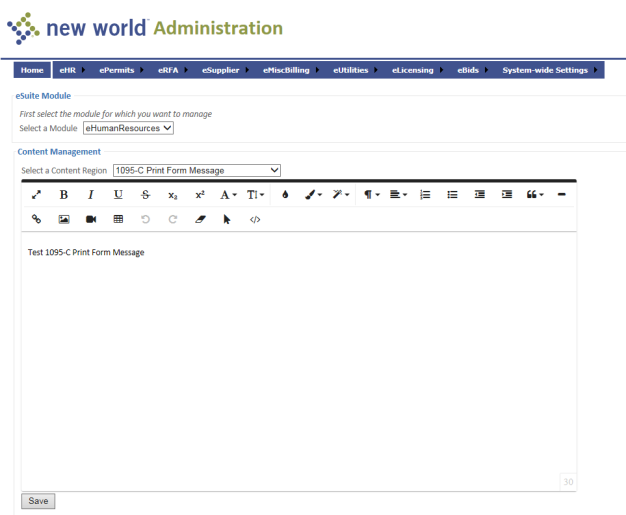
The Select a Module field defaults to eHumanResources; use this value.
Select a Content Region for which you want to define text. The options displayed in this field are determined by the module you selected above.
In the text editor below the Select a Content Region field, enter the text that will appear for the content region you specified. Text can be entered either in a design view (like typing a regular document) or in an HTML view (that shows the formatting tags).
Click Save to store the custom content.
Repeat Steps 1 through 4 for any other areas to which you want to add custom text.
The Employee Account Maintenance page allows administrators to maintain passwords and roles for employees. When you select Employee Account Maintenance from the eHR > eEmployee menu, you will see a screen like the following:
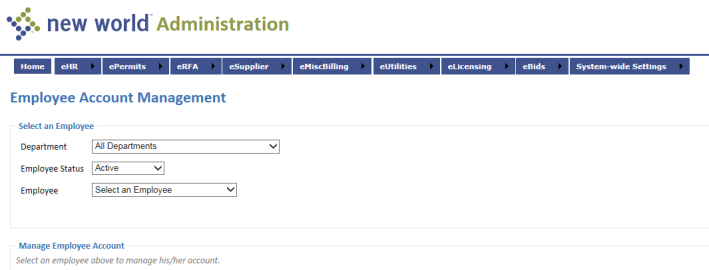
From the Select an Employee section, select a Department, if desired, to filter the list of employees.
Select the Employee you want to update. If the employee has an account, the details will load below on the page, as shown below. If the employee does not have an account, a message will display with a link to create an account.
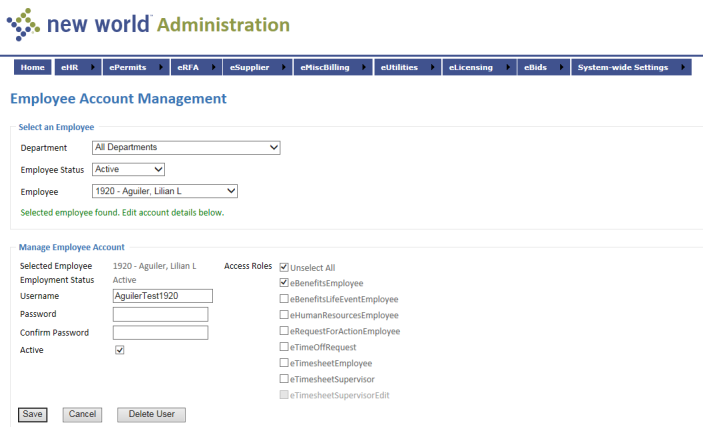
The employee’s Username may be edited, if desired.
The Password field is blank by default. If you are not changing the employee’s password, leave this field blank. The system will continue to use the current password.
If you have entered a new value in the Password field, the same value must be entered in the Confirm Password field.
The Active check box is selected by default, indicating that this is an active employee. Clear the check box if for some reason the employee is inactive.
Access Roles contains a list of possible roles for the employee. The roles to which the employee is currently assigned are selected. Use the Select All/Unselect All check box to add or remove all roles from the employee, or select and clear individual roles to change the employee’s association with the roles.
Click Save to retain the new settings.
To delete the user, click Delete User.
The Miscellaneous System Settings page currently contains the Display Settings for the Paycheck Information section. It allows administrators to set a default for employees’ paychecks:
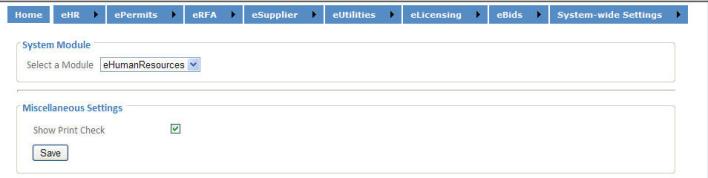
The default value for the Select a Module field is eHumanResources; use the default value.
Select the Show Print Check box if the employee should be able to print his paycheck from the My HR > Paycheck Information page.
Click Save to store the settings.
This section provides the setup necessary to use the Human Resources eRecruit section of the eSuite portal.
The Content Configuration page allows users to add custom text in certain areas of the application. When you select Content Configuration from the eRecruit menu, you will see a screen like the following:
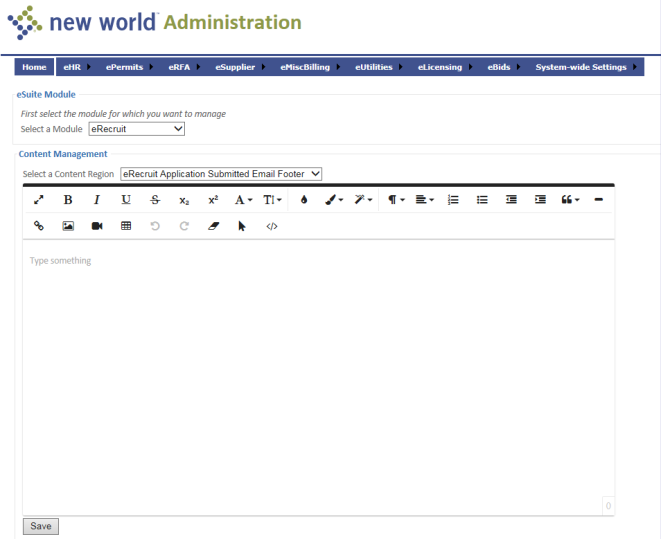
The Select a Module field defaults to eRecruit; use this value.
The Select a Content Region field contains the pages in the application where content may be defined. Select one of the following pages on which you wish to display a message:
eRecruit Home Page
eRecruit Ceremony Page
eRecruit Application Submitted Email Header
eRecruit Application Submitted Email Footer
In the Content Value box, type the text you want to appear on the page selected in the above list. This is the text users see when they log into the eSupplier site. Text entered here that is longer than the width of the resulting eRequest page will wrap to the next line in the space available.
Click Save to store the content configuration settings. Repeat steps as needed to define content for other eRecruit regions.
This section provides the setup necessary to use the Human Resources eTimesheets section of the eSuite portal.
If you want employees to book time to projects or have the ability to override the general ledger organization (G/L Org) during time entry, you will need to perform setup in Time Entry Roles in new world ERP.
How to give permission to use Time Entry Roles
Navigate to Maintenance > new world ERP Suite > Security > Users.
Select the user from the User List.
Click Permissions. The Permissions page will open.
Click the Show Search link in the top-right corner of the page.
In the Component Name field, type, Time Entry Roles.
Click Search. The grid on the Permissions page will reload with the Time Entry Roles component highlighted:
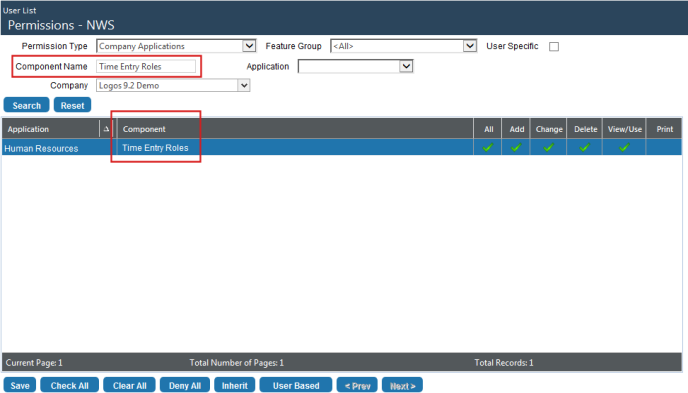
Give the user permission to the appropriate functions (Add, Change, etc.) within Time Entry Roles. Before any other permissions are available, the user needs a minimum of View/Use rights.
Click Save.
For the permissions to take effect, the user needs to log out and log back in.
How to set up Time Entry Roles
Navigate to Maintenance > Human Resources > eTimesheets > Time Entry Roles. The Time Entry Roles page will open:
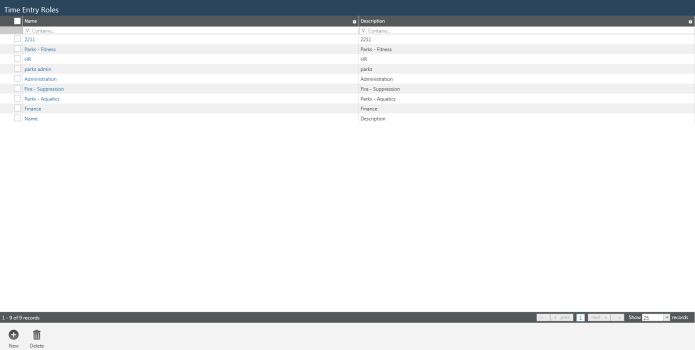
From this page, you may perform the following functions:
Assign projects to departments or groups of employees to ensure employees book time against relevant projects only. Projects are built through the Financial Management application and applied to time entry to associate wages within a general ledger account with various projects or grants.
Give departments or groups of employees the ability to override the general ledger accounts to which time normally is booked.
When a role is created, it will appear in the grid on this page.
To create a role, click New. The Add Role dialog will open:
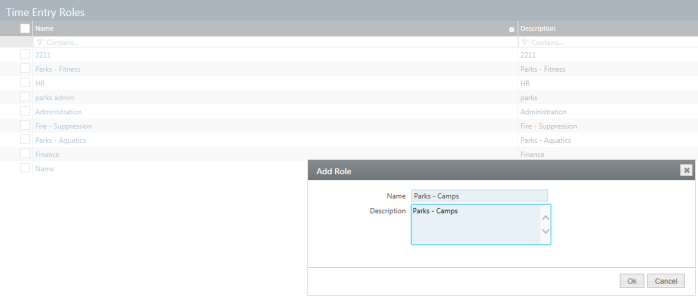
Type the role Name and Description.
Click OK. The role will be added to the grid.
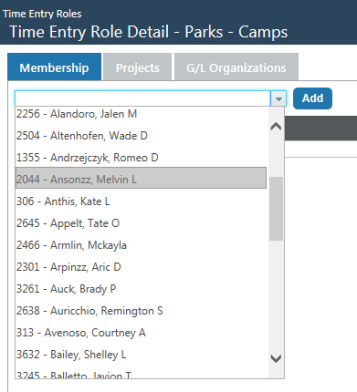
To assign members, projects and G/L organization sets to the role, click the role Name in the grid. The Time Entry Role Detail page will open, with the Membership tab brought forward:

Use this tab to assign members to the selected role. A member may be an individual employee or an entire department, so that all employees within the department will be assigned to the role.
Note: If an employee who is assigned to a role by department moves from one department to another, access to projects and G/L organization sets will be adjusted automatically. Employees who are assigned to roles individually will continue to keep the same rights, regardless of movement to other departments.
In the drop-down immediately below the Membership tab, select the department or employee who will be a member of the selected role. Use the prompt button to select from an alphabetized list of active departments and employees, or begin typing the ID or name of the department or employee, and select from a shorter list containing the IDs and names that match what you type:

Note: Employees may be members of multiple time entry roles.
Once you make a selection, click the Add button to add it to the grid below the button:
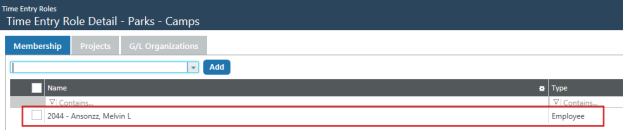
Continue to add members as needed.
Follow the same selection process on the other two tabs to assign projects and G/L organization sets to the members of the role. Projects and G/L organization sets appear on their drop-downs in ascending order by code.
Members who have been assigned to projects and G/L organization sets on the Time Entry Role Detail page will see Project and G/L Org selection columns on the Time Entry page in eTimesheets:
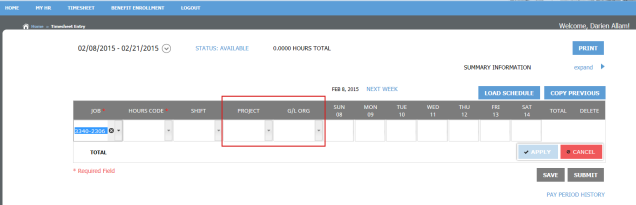
An employee who is not assigned to a role will not see either column in eTimesheets.
If you want employees with particular accrual profiles to be able to take accrual time before it is earned, thus reducing their current accrual balances to less than zero, navigate to Maintenance > Human Resources > Employee Attributes > Accrual Plans > New/Edit > Profile > New/Edit, and select the Allow Negative Balance check box on the Profile tab of the Accrual Profile Entry page:
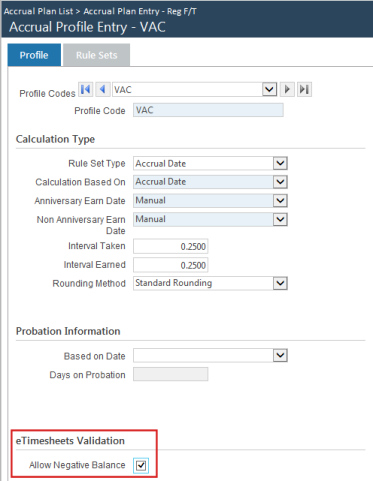
On submitting time in eTimesheets, employees will receive a warning dialog that shows what hours categories will fall below zero.
Leaving the Allow Negative Balance check box deselected will prevent employees from submitting time in excess of their accrual balances.
To make an employee’s default work schedule available for loading in eTimesheets, navigate to Human Resources > Workforce Administration > Search > Employee > Payroll Data > Schedule, and select the Include in eTimesheets check box in the employee’s Schedule Detail section of the Payroll Data tab:
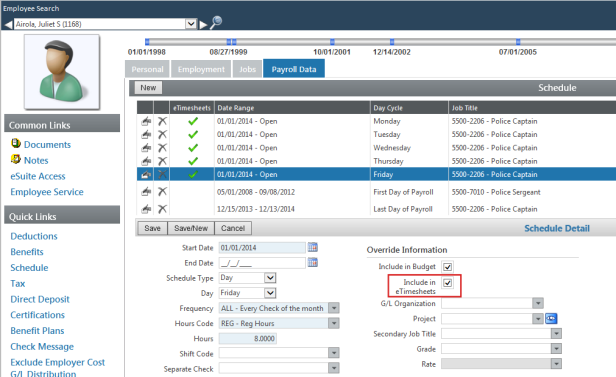
Employees with this box selected also will be able to load schedules for secondary jobs.
Note: When the hours code is an “other pay” or “other percent,” this check box will be disabled.
Each schedule that has Include in eTimesheets checked will show a green check mark in the eTimesheets column of the Schedule grid:
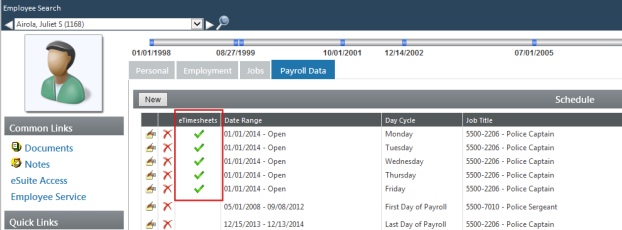
Note: If an employee is set up to use a benefit group holiday schedule and a holiday occurs within the pay period, when the schedule is loaded, holiday hours will replace the regular schedule entries for that day.
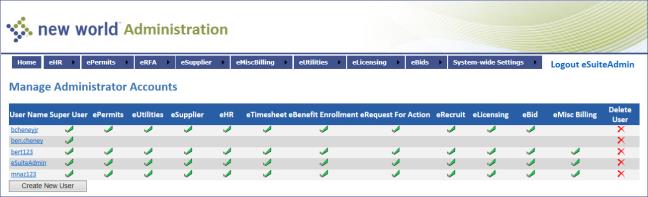
The Manage Administrator Accounts page lets administrators authorize users to set up eTimesheets and to export time.
To authorize a user to set up eTimesheets and to export time, navigate to Administration > System-wide Settings > Administrator Accounts:

The Manage Administrator Accounts page will open:

Users and their eSuite authorizations appear in a grid. Users who are authorized to set up eTimesheets and to export time show green check marks in the eTimesheet column.
To authorize an existing user, click the User Name in the grid. The Edit Administrator Account page will open:
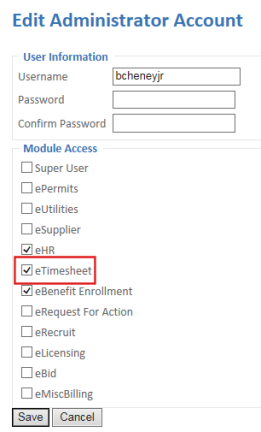
Select the eTimesheet check box.
Click Save.
To authorize a new user, click the Create New User button below the grid on the Manage Administrator Accounts page. The Create Administrator Account page will open:
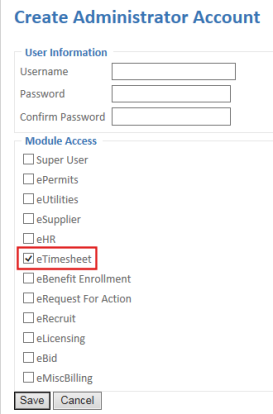
Fill in the Username, Password and Confirm Password fields.
Select the eTimesheet check box.
Click Save. The user will be added to the grid on the Manage Administrator Accounts page.
The Employee Account Management page lets administrators authorize users to enter and submit time and to approve time.
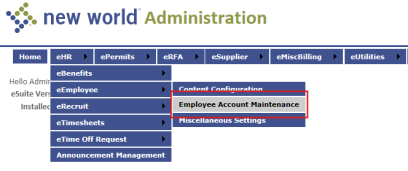
To authorize a user, navigate to Administration > eHR > eEmployee > Employee Account Maintenance:

To limit the Employee drop-down to employees of a particular department, select a Department. Leaving the All Departments default will give you a complete list of employees on the Employee drop-down.
Select the Employee Status. The available options are Active and Inactive.
Select the Employee. The Manage Employee Account section will expand to provide fields for the employee’s user name and password and check boxes for identifying the employee’s status and authorizing the employee to appropriate roles:
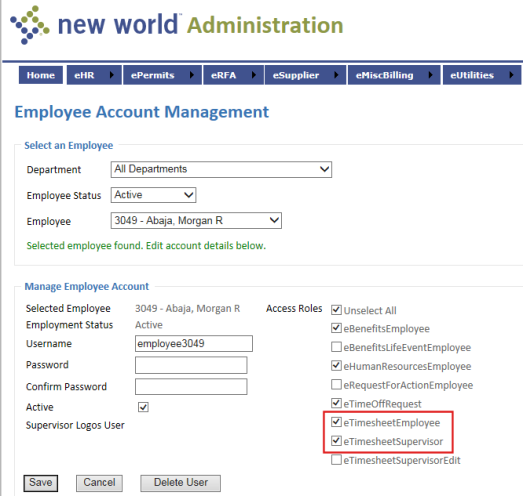
If the employee will be using eTimesheets to enter and submit time, select the eTimesheetsEmployee check box. If the employee also will be approving time, select the eTimesheetsSupervisor check box.
Click Save.
The Hours Code Setup page (eHR > eTimesheets > Hours Code Setup) lets you define hours code access for departments in the system. When you select the Hours Code Setup option from the eTimesheets menu, you will see the following screen:
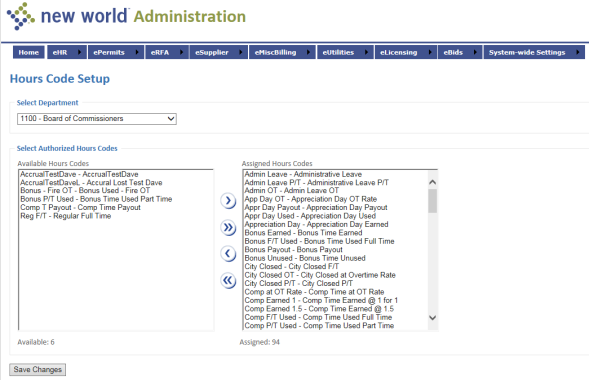
Select the department for which hours codes will be selected.
From the Available Hours Code field, select the hours codes that should be assigned to this department. You can select them one at a time and use the  key, or you can Ctrl+click all of the ones you want to select and use the key.
Note: Only hours codes with a Pay Type of Hourly will appear in the list.
Click Save Changes.
Repeat steps 1 through 3 for any other departments that need hours codes assigned.
The Supervisor Setup page (eHR > eTimesheets > Supervisor Setup) associates eHR employee (supervisor) accounts with a new world ERP user. The security defined for the new world ERP user determines the departments for which the eHR supervisor may approve time. When you select the Supervisor Setup option from the eTimesheets menu, you will see the following screen:
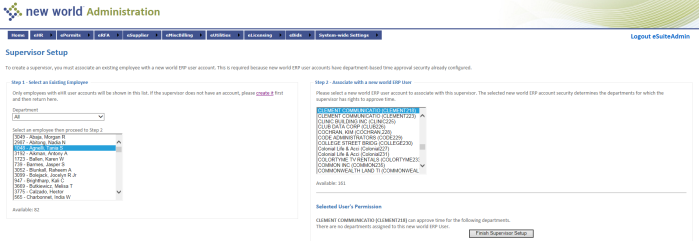
Select the Department for which you want to view eHR employees.
Selecting the Department will populate the employee list. Select the employee to be associated with a new world ERP user.
Note: Only employees who have an eHR account with eTimesheets Supervisor rights (see previous section, “Employee Account Management”) will appear in this list.
Selecting the employee will enable the list of new world ERP users. Select the user that to which the employee should be associated.
Once the new world ERP employee is selected, the selected user’s permission section displays. It shows the departments for which the new world ERP user can approve time.
Note: new world ERP user security setup determines the departments that appear here.
If the departments for the new world ERP user include the ones that you want for your eHR supervisor, click Finish Supervisor Setup to complete the supervisor setup.
The Miscellaneous Settings page (eHR > eEmployee > Miscellaneous Settings) contains the Display Settings for the Weekly Time Entry section. It lets you set a default for employees’ weekly time entry:
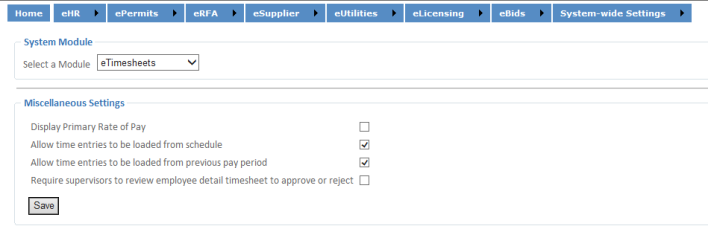
The default value for the Select a Module field is eTimesheets; use the default value.
Select the Display Primary Rate of Pay check box if employees’ primary rate of pay should display when they enter their time worked for the week.
Select the Allow time entries to be loaded from schedule check box to enable a Load Schedule button on the Timesheet Entry page. Clicking this button will load all schedule entries marked as Include in eTimesheets in Workforce Administration.
Select the Allow time entries to be loaded from previous pay period check box to enable a Copy Previous button on the Timesheet Entry page. Clicking this button will copy job, hours code, shift, project and general ledger account entries from the last pay period to the current one. These entries may be edited.
Select the Require supervisors to review employee detail timesheet to approve or reject check box to require supervisors to review employees' detailed timesheets before approving or rejecting them.
Click Save. to store the settings.
The Content Configuration menu option launches the Content Management page. It lets you define custom text in different areas of the eTimesheets module for the current batch:
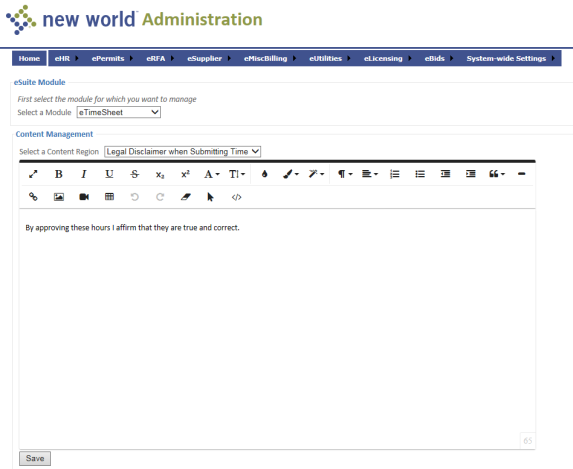
The Select a Module field defaults to eTimesheet; use this value.
Select the Content Region for which you want to define text. The options displayed in this field are determined by the module you selected above.
In the text editor below the Select a Content Region field, type the text that will appear for the content region you specified. Text may be entered in a design view (like typing a regular document) or in an HTML view (that shows the formatting tags).
Click Save to store the custom content.
The Export Time option lets users export timesheet information to new world ERP:
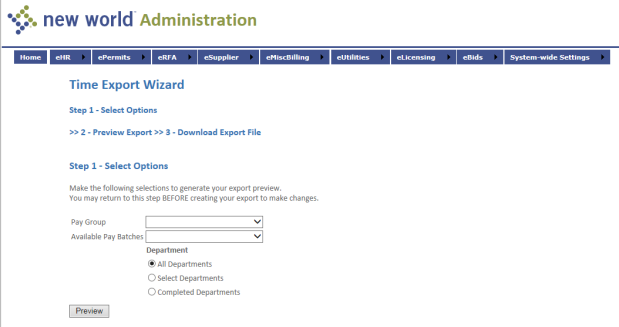
Select the Pay Group for which you want to export time. This value is required.
Once the Pay Group is selected, the Available Pay Batches field is populated with the batches defined for that pay group.
Select the appropriate pay batch. This value is required.
The All Departments option is selected by default. To restrict the departments for which time is exported, click the Select Departments option. This will display a Departments box where the user can select certain departments to be excluded from the export. To show departments with hours that are ready to be exported, select the Completed Departments option.
Click the Preview button to go on to step 2. You will see a screen like the following:
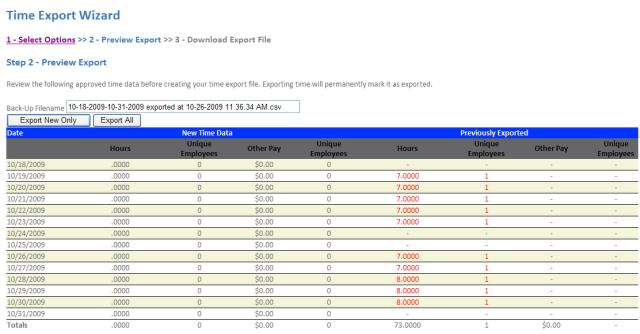
If you selected the Completed Departments option in the previous step, the departments that have been marked as completed in eTimesheets will show a status of “(Completed)" next to their names
Review the entries on the screen. If the batch has already been exported and there are new entries, you can select the Export New Only button to export only the entries that are new this time. To export each entry, click the Export All button. If you select Export All, you will see the following warning:
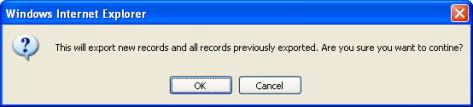
Click OK to go on to step 3. You will see a screen similar to the following:

As indicated on the screen above, the download should start automatically. You will see the following screen:
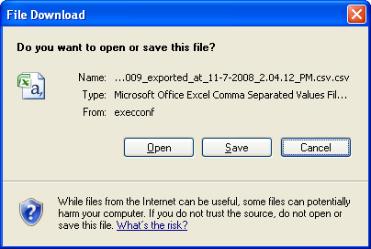
Open or save the download as desired. If you decide to save it, you will be prompted to select a destination. When the download is complete, you will see the following screen:
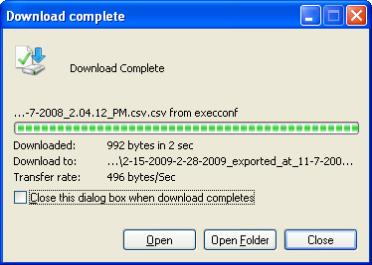
The export is now complete.
This section provides the instructions for setting up the announcements in the Human Resources section of eSuite.
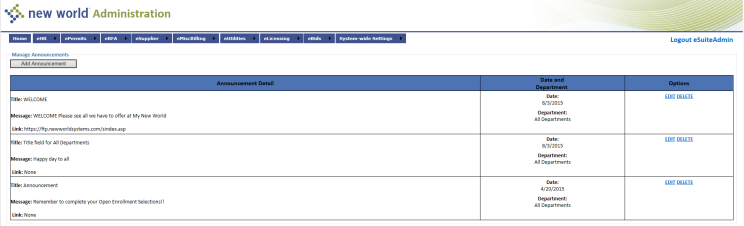
The Announcement Management page lists the announcements that have been defined for departments:
To add an announcement, click the Add Announcement button. You will see a screen like the following:
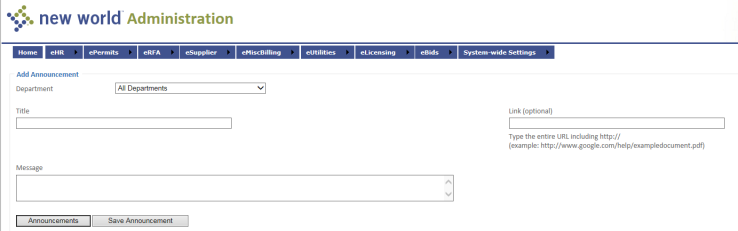
Select a Department that should receive the announcement. The default value is All Departments.
Enter the Title of the announcement to provide a description of the subject matter.
If the message is on a Web page, enter a URL in the Link (optional) field.
Enter the announcement text in the Message field.
Click Save Announcement to store the announcement. All of the fields may be changed in Edit mode.
This section provides the setup necessary to use the ePermits section of the eSuite portal for contractors to use.
The Public Inquiry Configuration page contains the settings that define what users have access to in public inquiry. Public Inquiry is the ability for the general public to access permit information about any address or permit in the system. It is usually enabled for municipalities that consider permit information as Public Information.
When you select the Public Inquiry Settings option from the ePermits menu, you will see a screen like the following:
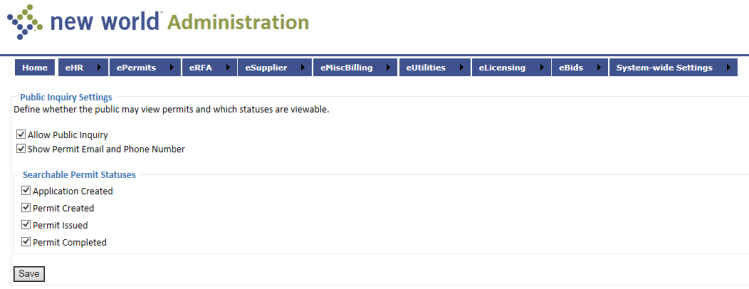
Select the Allow Public Inquiry check box if users should be allowed to access the public inquiry pages. Selecting this check box enables the other fields on the page.
Select Application Received if users should be able to search on this permit status.
Select Permit Pending if users should be able to search on this permit status.
Select Permit Issued if users should be able to search on this permit status.
Select Permit Complete if users should be able to search on this permit status.
Click Save to store the public inquiry settings.
The Permit Type Settings page allows the administrator to enable or disable permit types and control permissions for enabled permit types. When you select the Permit Type Settings option from the ePermits menu, you will see a screen like the following:
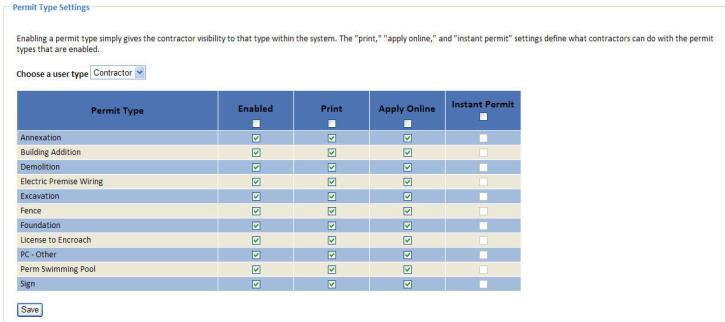
The Choose a user type field filters the list to show permits either for contractors or residents. Choose the user type for which you want to work with permits.
The grid lists each permit type defined in the system. Click the check box in the Enabled column to make the permit type visible to users and to enable the other three columns in the grid.
Select the Print check box if users should be able to print permits of this type. Printing is enabled only when a permit has been issued.
Select Apply Online if users should be able to apply online for permits of this type.
Select Instant Permit if users may have permits of this type issued online as soon as application and payment have occurred.
Click Save to store the permit type settings.
The Authentication Configuration page allows administrators to define the information, in addition to the company name, that will be required to authenticate an account. When you select the Authentication Configuration option from the ePermits menu, you will see a screen like the following:
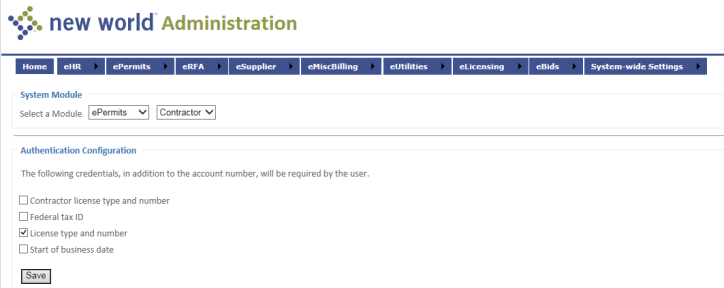
The Select a Module field defaults to ePermits Contractors; use these values. The following values can be required to authenticate a contractor account:
Select the Contractor License Type and Number check box if the contractor’s license information should be required for authentication. This license is the license the contractor has been issued from an outside agency, such as the State.
Select Federal Tax ID if the contractor’s license information should be required for authentication.
Select License Type and Number if the license type and number should be required for authentication. This license is a local license, such as is issued from the Business Licensing module.
Select Start of Business Date if the contractor’s business start date should be required for authentication.
To configure access for residents, select Resident in the System Module section. The following values can be required to authenticate a resident account:
Select the Last Name check box if the resident’s last name should be required for authentication.
Select Lot Number if the resident’s lot number should be required for authentication.
Select Move in Month and Year if the month and year that the resident moved in should be required for authentication.
Select Parcel Number if the resident’s parcel number should be required for authentication.
Click Save to store the credentials your organization wants to require.
The Content Configuration menu option launches the Content Management page. It allows the administrator to define custom text in different areas of the eBenefits module for the current batch.
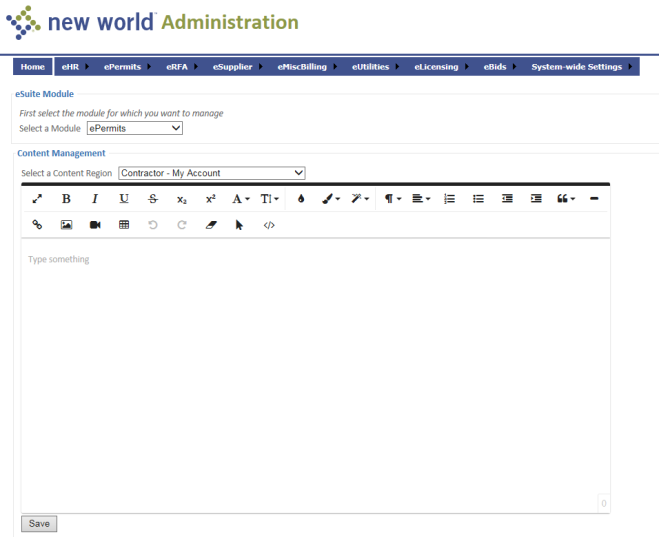
The Select a Module field defaults to ePermits; use this value.
The Select Batch field displays only when the Select a Module value is eBenefitEnrollment. Select the benefit enrollment batch for which you will define content.
Select a Content Region for which you want to define text. The options displayed in this field are determined by the module you selected above.
In the text editor below the Select a Content Region field, enter the text that will appear for the content region you specified. Text can be entered either in a design view (like typing a regular document) or in an HTML view (that shows the formatting tags).
Click Save to store the custom content.
Repeat Steps 1 through 5 for any other areas to which you want to add custom text.
The Online Payment Configuration page contains fields that may be used to configure the payment codes for use in online permits and service charges. When you select the Online Payment Configuration option from the ePermits menu, you will see a screen like the following:
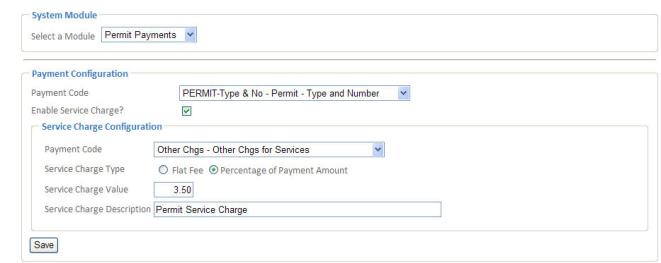
The Select a Module field defaults to Permit Payments; use this value.
Select the Payment Code that will be used to identify the bill payment in the system. This value is required.
Select the Enable Service Charge check box if a service charge should be allowed with permit payments. If it is selected, the Service Charge Configuration section will display.
Select the service charge Payment Code that will be used to identify the service charge payment in the system. This field is required if it is displayed.
Select the Service Charge Type: Flat Fee or Percentage of Payment Amount.
Enter the Service Charge Value. This is either a flat fee or a percentage, based on the charge type selected above. This field is required if it is displayed.
Enter a Service Charge Description; this should be text that will help you recognize the service charge. This field is required if it is displayed.
Click Save to store the confirmation information.
The Payment Email Confirmation page contains the Electronic (Email) Receipt fields, which can be used to define the email receipt that is sent to users to notify them that their payment has been received.
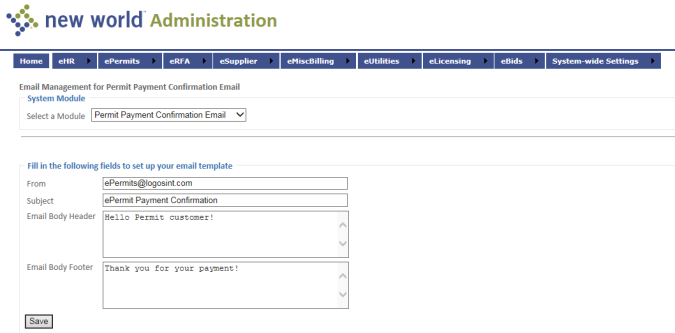
The Select a Module field defaults to Permit Payment Confirmation Email; use this value.
The From value will display as the “From” address on email messages sent to customers.
The Subject is required. Enter the text that should display as the email’s subject line.
By default, the body of the email message contains a summary of the payment. Use the Email Body Header to define text above the summary, if desired.
Use the Email Body Footer to define text below the payment summary, if desired.
Note: The Email Body Header and Email Body Footer fields do not accept HTML tags; they are for plain text only.
Click Save to store the email information.
The Permit Status Notification Settings page allows administrators to define the email that is sent to users to notify them of a change in their permit status. Permit status notification emails are sent to registered contractors any time the status of one of their permits changes. When you select the Status Notification Settings option from the ePermits menu, you will see a screen like the following:
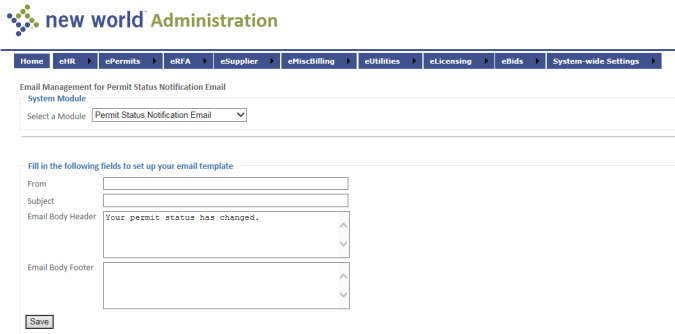
The Select a Module field defaults to Permit Status Notification Email; use this value.
Enter a Subject, if desired; this will display as the email’s subject line.
The From value will display as the “From” address on email messages sent to customers.
By default, the body of the email message contains a summary of the permit changes. Use the Email Body Header to define text above the summary, if desired.
Use the Email Body Footer to define text below the permit summary, if desired.
Note: The Email Body Header and Email Body Footer fields do not accept HTML tags; they are for plain text only.
Click Save to store the information.
The Contractor Account Management page allows administrators to create, edit, and enable/disable contractor accounts in the system. When you select the Contractor Account Management option from the ePermits menu, you will see a screen like the following:
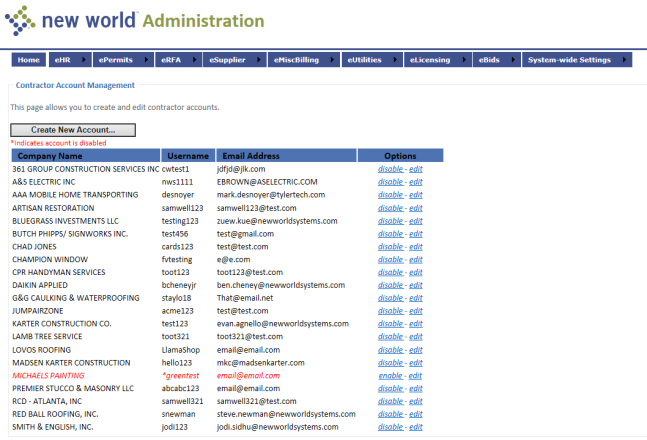
To disable a contractor account, click the Disable link. The row will turn red, indicating that it is disabled, and the Disable link will now read Enable. To re-enable it, click the Enable link.
To create a contractor in eSuite, click the Create New Account button. You will see the following screen:
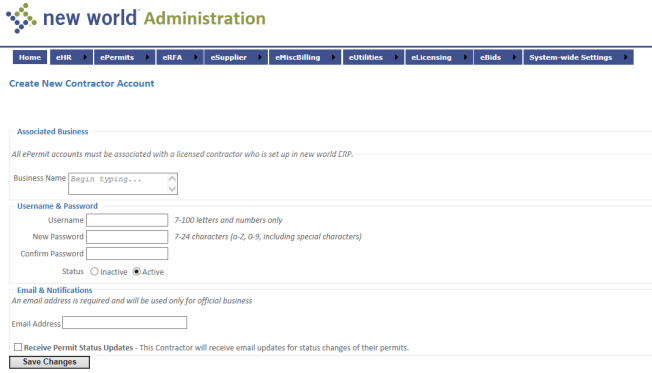
Enter the contractor’s Business Name. Each account must be associated with a licensed contractor in new world ERP.
Enter a Username for the contractor. The Username is required and must be at least 7 characters long.
Enter a New Password for the contractor. The password is required. It may contain letters and numbers only and must be between 7 and 24 characters long.
Re-type the password in the Confirm Password field.
Set the Status for the contractor, Active or Inactive.
Enter an Email Address for the contractor. The address is required.
Select the Receive Permit Status Updates check box if the contractor should receive an email notification when the status of their permit changes.
To edit a contractor account, click the Edit link for that row on the Contractor Account Management page. It will launch a page with the same fields as the Create New Contractor Account page, except that the Business Name field is not included.
Note: When you edit an account, if you do not want to change the password, leave those fields blank.
Make any changes needed on the account.
Click Save Changes to store the changes.
The Miscellaneous Settings page contains those settings that did not fit into one of the previous categories. When you select the Miscellaneous Settings option from the ePermits menu, you will see a screen like the following:
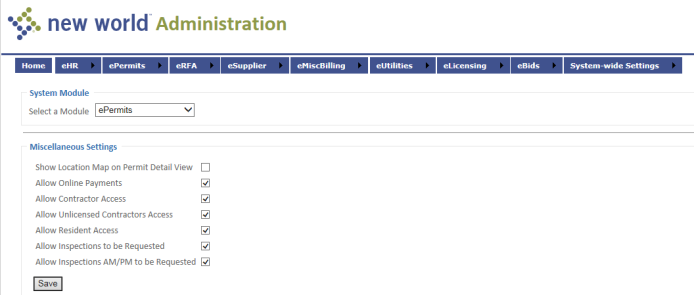
The Select a Module field defaults to ePermits; use this value.
Select the Show Inspection on Permit Detail View check box to include inspections information on the Permits Details screen. This enables contractors to request an inspection date/time.
Select Show Location Map on Permit Detail View to include a map as part of the location summary information on the Permit Details screen.
Select Allow Online Payments if online payments should be allowed in ePermits.
Select Allow Contractor Access if contractors should be allowed to use ePermits to apply for or to renew permits.
Select Allow Unlicensed Contractor Access if unlicensed contractors should be allowed to use ePermits to apply for or to renew permits.
Select Allow Resident Access if residents should be allowed to use ePermits to apply for or to renew permits.
Click Save to store the miscellaneous settings.
This section provides the setup necessary to use the eRequest for Action section of the eSuite portal.
The Permissions and Required Fields Settings page contains the settings that define what users are able to view and access on the eRequest for Action pages. The eRequest for Action site allows internal and external users to view and submit requests for service to be completed—for example, sign repair, pothole, or IT help desk assistance for internal users.
When you select the Permissions and Required Fields Settings option from the eRFA menu, you will see a screen like the following:
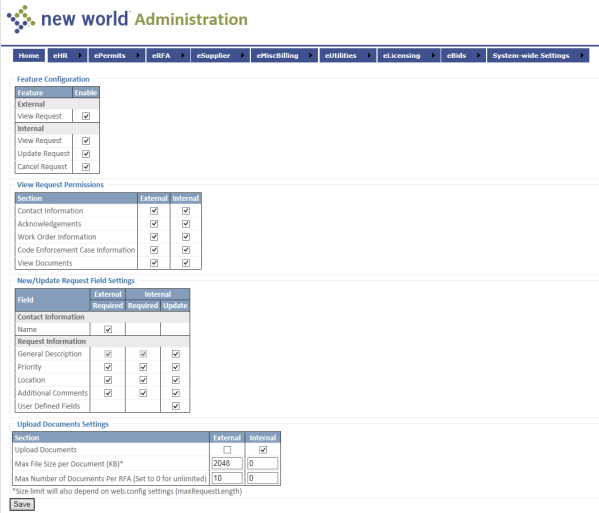
Feature Configuration
Select the External View Request check box if external users should be able to view all requests they submitted.
Select Internal View Request if internal users should be able to view all requests they submitted.
Select Update Request if internal users should be able to update any request they submitted.
Select Cancel Request if internal users should be able to cancel any request they submitted.
View Request Permissions
The settings for these permissions apply only to requests displayed in the View mode.
Select the Contact Information check box for External and/or Internal users to be able to view the contact information on the request.
Select Acknowledgements for External and/or Internal users to be able to view the acknowledgement information on the request.
Select Work Order Information for External and/or Internal users to be able to view the work order information associated with the request.
Select Code Enforcement Case Information for External and/or Internal users to be able to view the case information associated with the request.
New/Update Request Field Settings
The settings for these fields apply only to the request page in new or edit mode.
Select the Name check box if the contact name is required for external users who submit a request.
For General Description, the Required check boxes are always selected and disabled. Select the Update check box if Internal users are required to provide a general description of the request and/or should be able to update the request description.
For Priority, select Required and/or Update if External and/or Internal users should be able to update the request priority.
For Location, select Required and/or Update if External and/or Internal users are required to provide a location for the request and/or should be able to update the request location.
For Additional Comments, select Required and/or Update if External and/or Internal users are required to provide additional comments on the request and/or should be able to update the request comments.
For User Defined Fields, select Update if Internal users should be able to update the user-defined fields.
Click Save to store the permissions and fields settings.
The Content Configuration page allows users to add custom text in certain areas of the application. When you select the Content Configuration option from the eRFA menu, you will see a screen like the following:
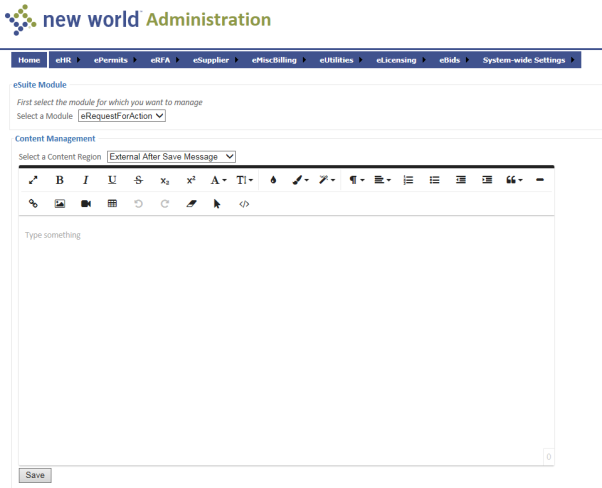
The Select a Module field defaults to eRequestForAction; use this value.
The Select a Content Region drop-down contains the pages in the application where content may be defined. Select one of the following pages on which to display a message:
- Welcome Page
- List Page
- View Page
- New/Update Page
- External After Save
- Internal After Save
- Internal After Update
Note: The options displayed in this field are determined by the module you selected above.
In the text editor below the Select a Content Region field, enter the text that will appear for the content region you specified. Text may be entered in a design view (like typing a regular document) or in an HTML view (shows the formatting tags).
Click Save to store the content configuration settings.
This section provides the setup necessary to use the Financial Management eSupplier section of the eSuite portal.
The Authentication Configuration page allows administrators to select the values that a supplier/vendor will need to provide in order to authenticate and activate their account. The vendor name will be required in all cases.
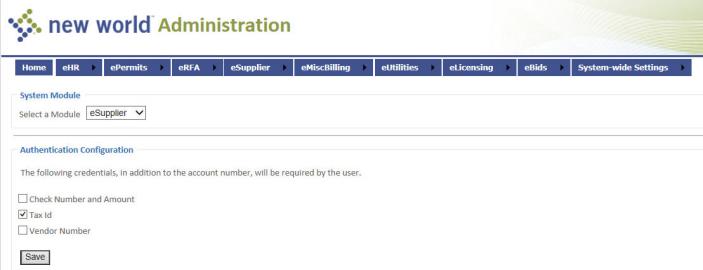
The Select a Module field defaults to eSupplier; use this value.
Select the Check Number and Amount check box if these values should be required to authenticate a supplier account. If this option is selected, suppliers will be required to provide this information from a recent check they have received from your organization.
Select the Tax ID check box if suppliers should supply their tax ID number.
Select the Vendor Number check box to require suppliers to provide their vendor number.
Click Save to apply the credentials.
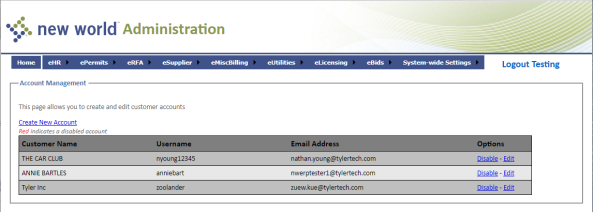
The Supplier Account Management page allows users to create and/or edit supplier accounts. When you select this option, you will see the following screen:
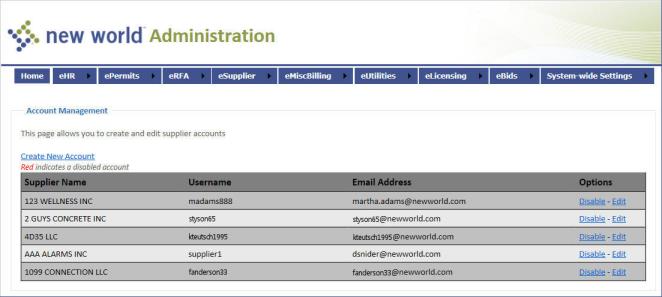
Create a Supplier Account
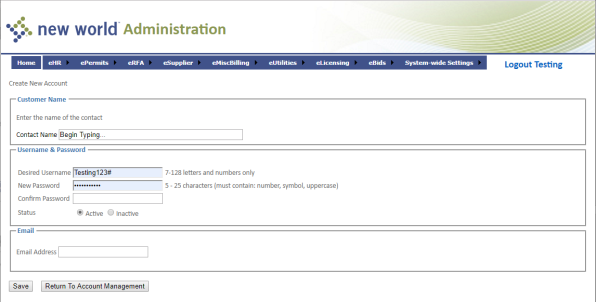
The Create New Account page is launched when you select the Create New Account link on the Supplier Account Management page:
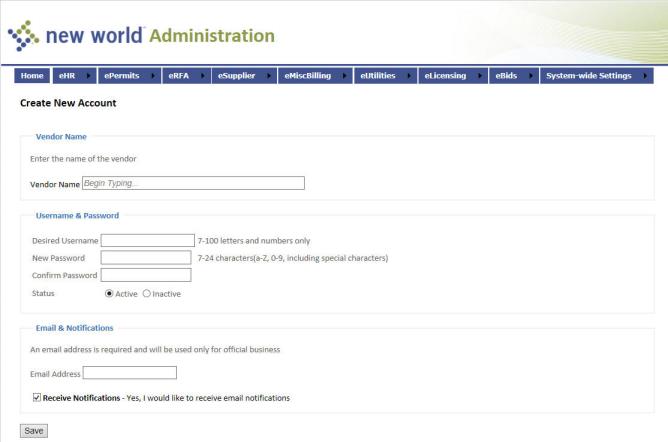
Enter the Vendor Name as it appears in new world ERP. This value is required. The name must match an existing vendor in new world ERP.
Enter the Desired Username for this vendor. This value is required. It may contain between 7 and 100 alphanumeric characters.
Enter a New Password for the vendor. This value is required. It may contain between 7 and 24 characters.
Re-enter the password in the Confirm Password field. This value is required.
The account has its Status set to Active by default. Select Inactive if you are adding the supplier in advance of its being active.
Enter an Email Address for the supplier. It will be used only for official messages from your organization. This value is required.
If the vendor would also like to receive notifications via email, select the Receive Notifications check box.
Click Save to store the account.
Edit Account
When you select the Edit option for a supplier account, you will see the following screen:
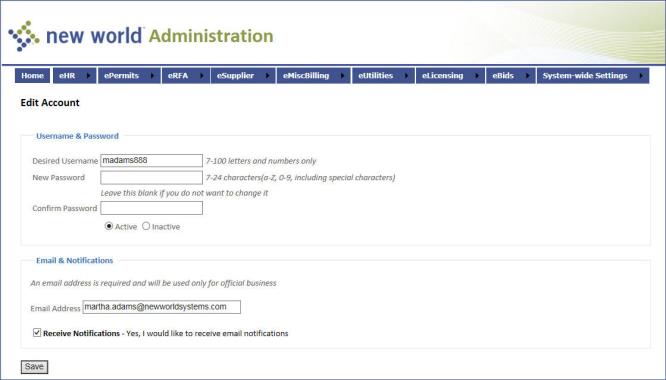
This page contains the same fields as the Create New Account page discussed above. Change the values as needed and click Save to store the account.
Note: When you edit an account, if you do not want to change the password, leave those fields blank.
The Content Configuration page allows users to add custom text in certain areas of the application. When you select the Content Configuration option from the eSupplier menu, you will see a screen like the following:
The Select a Module field defaults to eSupplier; use this value.
The Select a Content Region drop-down contains the pages in the application where content may be defined. Select one of the following pages on which you wish to display a message:
- Login Page
- Dashboard Page
- Payments Page
- Payment Details Page
- Invoices Page
- Invoice Details Page
- Purchase Orders Page
- Purchase Order Details Page
- General Information Page
- Contact Information Page
- Items Page
- Item Details Page
- Supplier Not Enabled Message
- Supplier Self Service Confirmation Page
- Supplier Self Service Supplier General Page
- Supplier Self Service Vendor Contact Page
- Bid Announcements
- Bid Help
The Enter Region Text box displays if the Login page is the content region. Type the text you want to appear on the page selected in the above list. This is the text users see when they log into the eSupplier site. Text entered here that is longer than the width of the resulting eRequest page will wrap to the next line in the space available.
For all other content region values, a text editor displays below the Select a Content Region field. Enter the text that will appear for the content region you specified. Text can be entered either in a design view (like typing a regular document) or in an HTML view (that shows the formatting tags).
Click Save to store the content configuration settings.
The Page Access page allows administrators to determine which pages suppliers may see on the eSupplier site. When you select Page Access from the eSupplier menu, you will see a screen like the following:
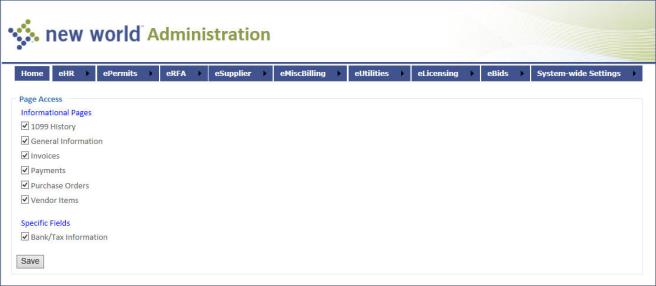
Informational Pages
The Informational Pages section contains fields that determine which informational data suppliers may view.
Select the 1099 History check box to allow suppliers to view previous years’ 1099 information.
Select the General Information check box to allow suppliers to view basic information.
Select the Invoices check box to allow suppliers to view invoice information.
Select the Payments check box to allow suppliers to view payment information.
Select the Purchase Orders check box to allow suppliers to view purchase order information.
Select the Vendor Items check box to allow suppliers to view vendor items information.
Specific Fields
The Specific Fields section contains fields that determine allow administrators to give vendors access to specific fields.
Select the Bank/Tax Information check box to allow suppliers to view bank/tax information.
Click Save to retain the page and field settings.
The Purchase Order Print Settings page allows administrators to determine the purchase order statuses suppliers may reprint and the options that will be available as output preferences.

Select the Allow Purchase Order Printing check box to allow suppliers to reprint their purchase orders. The status check boxes are enabled when this check box is selected.
Select any combination of the statuses that suppliers should be allowed to reprint. The options are Open, Closed, and Void.
The Purchase Order Form Configuration section determine which output preferences suppliers will be able to select when they reprint purchase orders.
Select Print full description if suppliers should have the option to reprint the description on the purchase order.
Select Calculate and print tax amount if suppliers should have the option to include the tax amount on the reprinted purchase order.
Select Print subtotals by PO status if the output should include subtotals based on the purchase order status.
Select Include only open items in PO totals if only open purchase order items should be included in the totals
Click Save to retain the page and field settings.
This section provides the setup necessary to use the Financial Management eMiscellaneous Billing section of the eSuite portal.
Selecting Account Management from the eMiscBilling menu opens the Account Management page, which allows administrators to create and edit eMiscellaneous Billing accounts.
Clicking Create New Account on the Account Management page opens the Create New Account page.
Selecting the Content Configuration menu option launches the Content Management page. This page allows the administrator to define custom text in different areas of the eMiscellaneous Billing module.
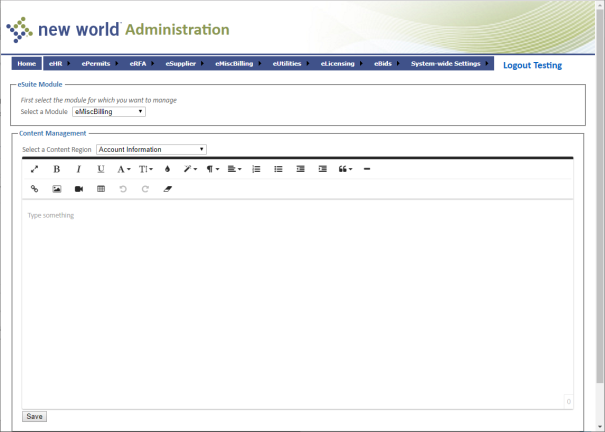
The Select a Module field defaults to eMiscBilling; use this value.
Select a Content Region for which you want to define text. The options defined in this field are determined by the module you select above.
In the text editor below the Select a Content Region field, enter the text that will appear for the content region you specified. Text can be entered either in a design view (like typing a regular document) or in an HTML view (that shows the formatting tags).
Click Save to store the custom content.
Repeat steps 1 through 4 for any other areas to which you want to add custom text.
The Invoice Type Settings page allows you to determine which Miscellaneous Billing Invoice Types are enabled in eSuite and which can be paid via eSuite. Invoice Types will display here if the user identified in eSuite deployment as the eSuite User has user-based security to the Miscellaneous Billing Invoice Type in New World ERP.
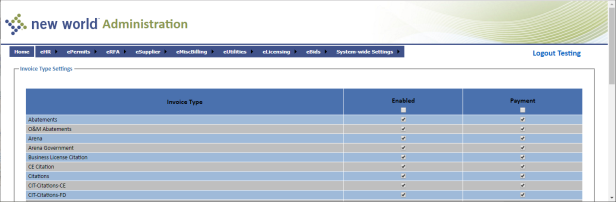
For a given invoice type, select the Enabled check box to enable the type in eSuite, or clear it to disable the type.
For those invoice types that can be payed via eSuite, select the Payment check box. Clear the Payment check box for those invoice types that are not payable via eSuite.
The Miscellaneous Settings page allows you to enable or disable administrative settings on the eSuite site.
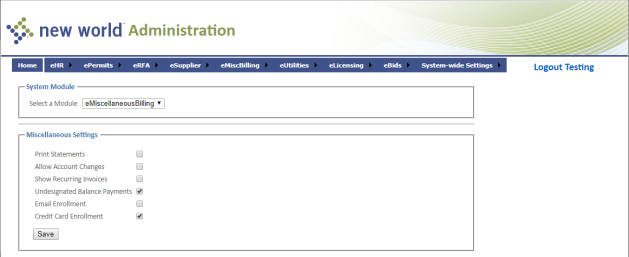
Select the Print Statements check box to allow customers to print an invoice summary in eMiscellaneous Billing.
Select Allow Account Changes to allow customers to change their contact information in eMiscellaneous Billing.
Select Recurring Invoices to display recurring invoices on the Account Information page in eMiscellaneous Billing.
Select Undesignated Balance Payments to allow customers to add cash on account from the Account Information page in eMiscellaneous Billing.
Select Email Enrollment to allow customers to enroll in notifications for MB Invoices, Notices, and Statements. This will enable the Email Enrollment page in eMiscellaneous Billing.
Select Credit Card Enrollment to allow customers to enroll in recurring credit card processing through eMiscellaneous Billing. This will enable the Credit Card Enrollment page in eMiscellaneous Billing. (NOTE: This functionality is currently not available for eMiscellaneous Billing.)
This section provides the setup necessary to use the Utility Management section of the eSuite portal.
The Authentication Configuration page allows users to define the information, in addition to the account number, that will be required to log into the application. These options should be similar to the questions your organization asks callers to authenticate them to a utility account.
When you select the Authentication Configuration option from the eUtilities menu, you will see a screen like the following:
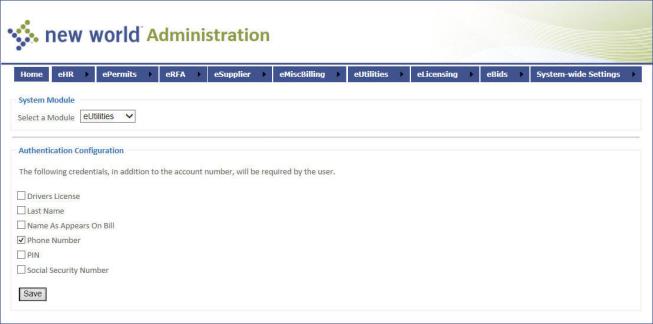
The Select a Module field defaults to eUtilties; use this value.
Select the Driver’s License check box if the user’s driver’s license should be required for the login.
Select the Last Name check box if the user’s last name should be required for the login.
Select the Name as Appears on Bill check box if the customer should be required to provide their name, as it appears on their utility bill, should be required when they log in.
Select the Phone Number check box if the user’s phone number should be required for the login.
Select the PIN check box if the user’s PIN should be required for the login. A PIN is issued to customers and is valid for the time their name is on the account. If a new customer moves into the account, a new PIN will be issued.
Select the Social Security Number check box if the last four digits of the user’s Social Security Number should be required for the login.
Click Save to store the credentials your organization wants to require.
The Set Page Security page allows users to set page permissions for authenticated and not authenticated user roles. Page security is primarily used by municipalities that enable utility account information as Public Information. When you select the Page Security Settings option from the eUtilties menu, you will see a screen like the following:
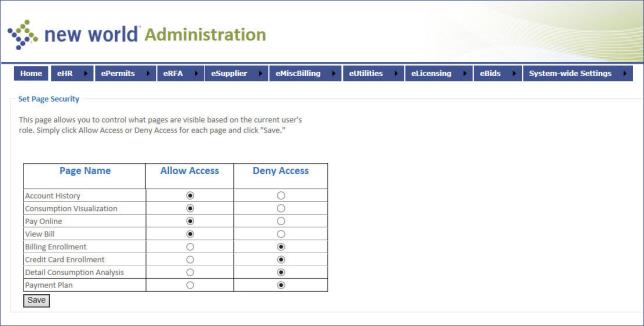
Set the security for each of the options in the grid.
Click Save to store the settings for this role.
Repeat Steps 1-3 for the Non-Authenticated role.
The Content Configuration page allows users to configure content in certain areas of the application. When you select the Content Configuration option from the eUtilities menu, you will see a screen like the following:
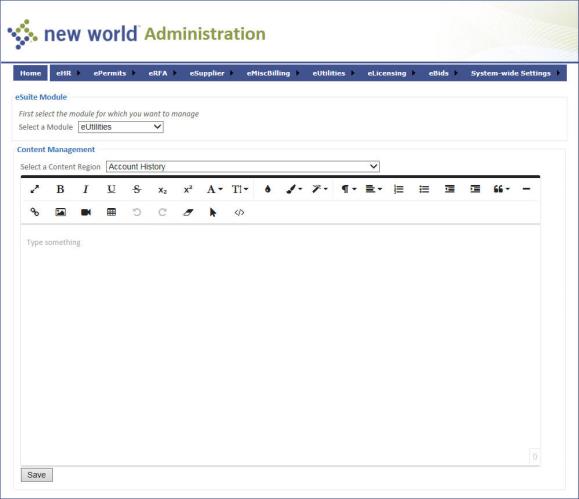
The Select a Module field defaults to eUtilities; use this value.
The Select a Content Region drop-down contains the pages in the application where content may be defined. Select one of the following pages on which you wish to display a message:
Consumption Visualization Help Text.
Payment Terms and Conditions.
eSuite Access Denied Message.
eBill - Content for Status Not Enrolled.
eBill - Content for Status Pending Email Activation.
eBill - Content for Status Actively Enrolled.
The Enter Region Text box displays if Consumption Visualization Help Text is the content region value. type the text you want to appear on the page selected in the above list. This is the text users see when they log into the eSupplier site. Text entered here that is longer than the width of the resulting eRequest page will wrap to the next line in the space available.
For all other content region values, a text editor displays below the Select a Content Region field. Enter the text that will appear for the content region you specified. Text can be entered either in a design view (like typing a regular document) or in an HTML view (that shows the formatting tags).
Click Save to store the configurations.
The Payment Confirmation page contains fields that can be used to define the email receipt that is sent to users to notify them that the utility organization has received their payment. When you select the Payment Email Confirmation option from the eUtilities menu, you will see a screen like the following:
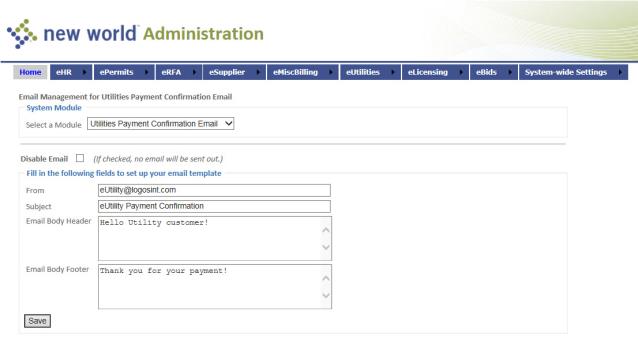
The Select a Module field defaults to Utilities Payment Confirmation Email; use this value.
The Sending Email Address value will display as the “from” address on email messages sent to utility customers.
Enter a Subject, if desired. The text will display as the email’s subject line.
By default, the email message contains a summary of the payment. Use the Email Body Header to define text above the summary, if desired.
Use the Email Body Footer to define text below the payment summary, if desired.
Note: The Email Body Header and Email Body Footer fields do not accept HTML tags; they are for plain text only.
Click Save to store the confirmation information.
The Miscellaneous Settings page contains those settings that did not fit into one of the previous categories. When you select the Miscellaneous Settings option from the eUtilities menu, you will see a screen like the following:
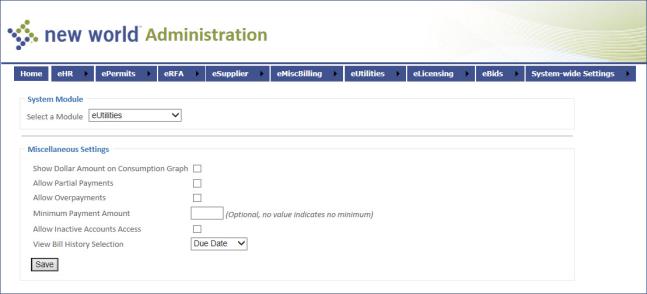
The Select a Module field defaults to eUtilities; use this value.
Select the Show Dollar Amount on Consumption Graph check box for the consumption graph to include a line graph of the dollar amounts for the corresponding consumption. If this check box is cleared, only consumption will show on the graph.
Select the Allow Partial Payments check box if accounts are allowed to make partial payments using eSuite.
Select the Allow Overpayments check box if accounts are allowed to make overpayments using eSuite.
If there is a Minimum Payment Amount threshold for paying bills on eSuite, enter the dollar value in this field. If the field is left blank, payments of any amount are accepted.
Select the Allow Inactive Accounts Access check box if inactive accounts should be able to log into eSuite.
Click Save to store the miscellaneous configuration(s).
This section provides the setup necessary to use the Licensing section of the eSuite portal.
The Authentication Configuration page allows users to define the information, in addition to the account number, that will be required to log into the application. These options should be similar to the questions your organization asks callers to authenticate them to a license.
When you select the Authentication Configuration link from the eLicensing menu, you will see a screen like the following:

The Select a Module field defaults to eLicensng; use this value.
Select the Last Name check box if the user’s last name should be required for the login.
Select Renewal Number if the license renewal number should be required for the login.
Select Tax ID if the user’s Tax ID should be required for the login.
Click Save to store the credentials your organization wants to require.
The License Type Settings page allows the administrator to enable or disable permissions for the license types defined. When you select the License Type Settings link from the eLicensing menu, you will see a screen like the following:
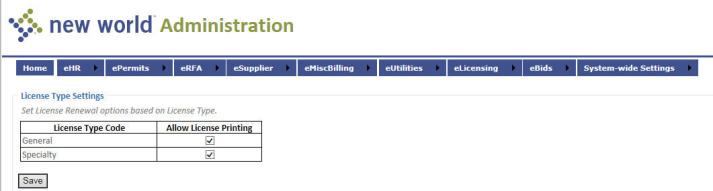
Select Allow License Printing if users should be able to print licenses of this type.
Click Save to store the permit type settings.
The Content Configuration page allows users to configure content in certain areas of the application. When you select the Content Configuration link from the eLicensing menu, you will see a screen like the following:
The Select a Module field defaults to eLicensing; use this value.
The Select a Content Region drop-down contains the pages in the application where content may be defined. Select one of the following pages on which you wish to display a message:
Payment Terms and Conditions.
Renewal Default Form.
License Renewal Form.
Renewal Payment Form.
Renewal Receipt Form.
A text editor displays below the Select a Content Region field. Enter the text that will appear for the content region you specified. Text may be entered either in a design view (like typing a regular document) or in an HTML view (that shows the formatting tags).
Click Save to store the configurations.
The Online Payment Configuration page contains fields that can be used to configure the service charges that the utility organization will apply to online payments. When you select the Online Payment Configuration link from the eLicensing menu, you will see a screen like the following:
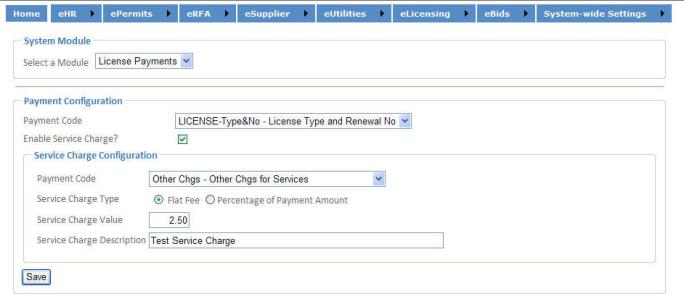
The Select a Module field defaults to License Payments; use this value.
Select the Payment Code that will be used to identify the license payment in the system. This value is required.
Select the Enable Service Charge check box to use service charges. This will enable the other fields on the page.
Enter the Payment Code that will be used to identify the service charge payment in the system. This entry is required if the field is displayed.
Select the Type of Charge that will be assessed: Flat Fee or Percentage of Amount.
Enter the Service Charge Value. This entry is required if the field is enabled. If Flat Fee is the charge type, this is a dollar amount. If Percentage of Amount is the charge type, this is a percentage.
Enter a Service Charge Description value to describe the charge. This entry is required if the field is enabled.
Click Save to store the configuration information.
Maintenance > new world ERP Suite > Revenue Collection > Payment Codes
For the License Payment tables to be updated correctly when license payment receipts are created, the License Payment code in use for eSuite payments must have its Transaction Reference Number Format value set to License Type and Renewal Number (License Charges):
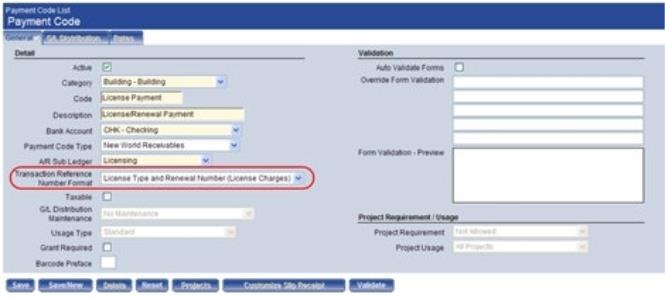
Note: If a payment code with out this setup is used, the account number will not be added to the receipt, and sub ledger processing will not work correctly. Batches using an incorrect payment code will need to be posted, voided, and re-entered for proper processing to occur.
The Payment Email Confirmation page contains the Electronic (Email) Receipt fields, which may be used to define the email receipt that is sent to users to notify them that their payment has been received.
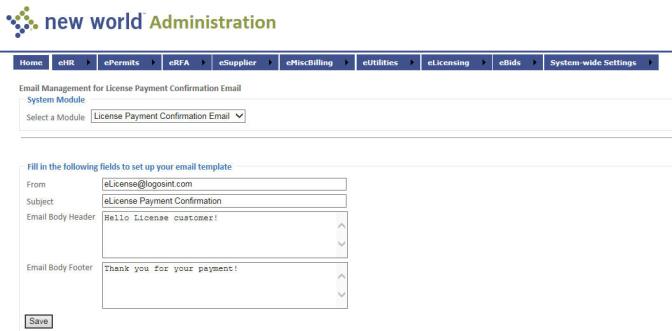
The Select a Module field defaults to License Payment Confirmation Email; use this value.
The From value will display as the “From” address on email messages sent to customers.
The Email Subject is required. Enter the text that should display as the email’s subject line.
By default, the body of the email message contains a summary of the payment. Use the Email Body Header to define text above the summary, if desired.
Use the Email Body Footer to define text below the payment summary, if desired.
Note: The Email Body Header and Email Body Footer fields do not accept HTML tags; they are for plain text only.
Click Save to store the email information.
The Miscellaneous Settings page contains those settings that did not fit into one of the previous categories. When you select the Miscellaneous Settings link from the eUtilities menu, you will see a screen like the following:
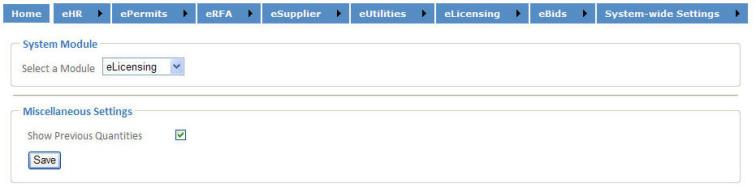
The Select a Module field defaults to eLicensing; use this value.
Select the Show Previous Quantities check box if you want the previous values for quantity-based fees to display on the renewal.
Click Save to store the miscellaneous configuration(s).
This section provides the setup necessary to use the eBids section of the eSuite portal. Bid announcements and bid help text can be maintained through the eSuite administration website under content configuration on the eBid tab. Options for displaying bid responses and closed bid documents and events are also maintained from the administration site.
The Permissions and Required Fields Settings page contains the settings that define what users are able to view and access on the eRequest for Action pages. The eRequest for Action site allows both internal and external users to view and submit requests for service to be completed, for example, sign repair, pothole, or IT help desk assistance for internal users.
When you select the Permissions and Required Fields Settings option from the eBids menu, you will see a screen like the following:
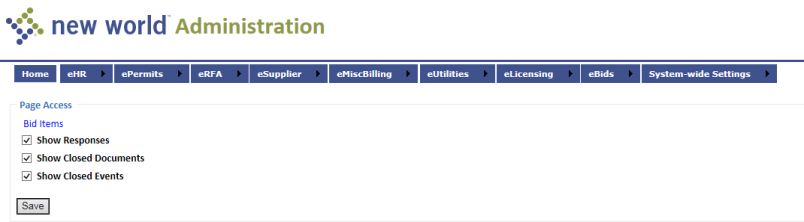
Page Access:
Select the Show Responses check box if users should be able to see the responses to bid items.
Select the Show Closed Documents check box if users should be able to see closed bid item documents.
Select the Show Closed Events check box if internal users should be able to see closed bid item events.
Click Save to store the permissions and fields settings.
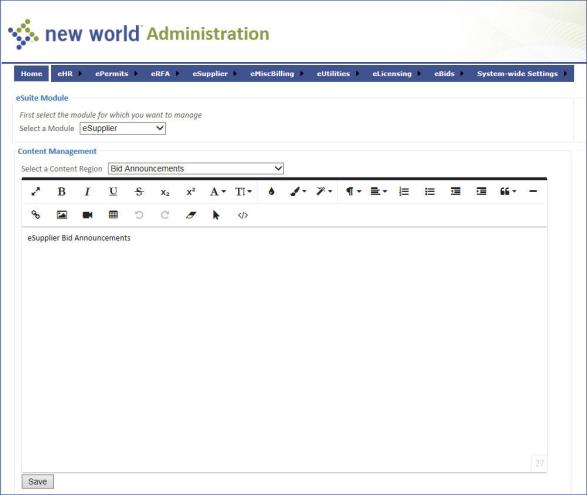
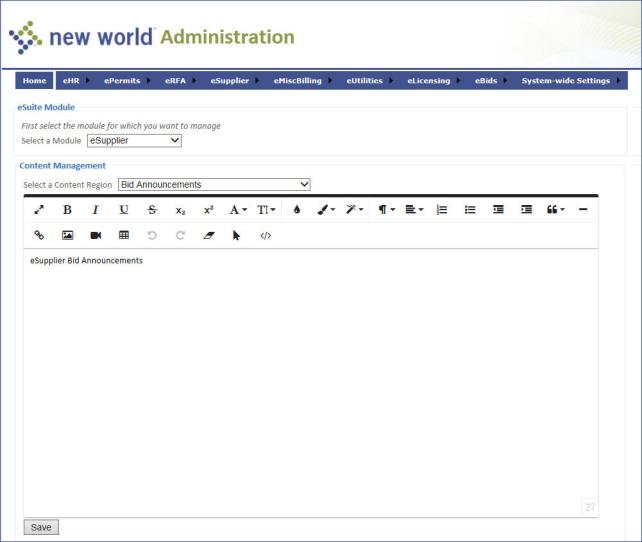
The Content Configuration page allows users to add custom text in certain areas of the application. When you select the Content Configuration option from the eBids menu, you will see a screen like the following:

The Select a Module field defaults to eBids; use this value.
The Select a Content Region drop-down contains the pages in the application where content may be defined. Select one of the following pages on which you wish to display a message:
Bid Announcements
Bid Help
Select the Content Region for which you want to define text. The options displayed in this field are determined by the module you selected above.
In the text editor below the Content Region field, enter the text that will appear for the content region you specified. Text can be entered either in a design view (like typing a regular document) or in an HTML view (that shows the formatting tags).
Click Save to store the content configuration settings.
This section provides the setup necessary to define eSuite administrators.
The Customize Interface page allows your organization to customize the look of your eSuite pages. When you select the Customize Interface option from the System-wide Settings menu, you will see a screen like the following:
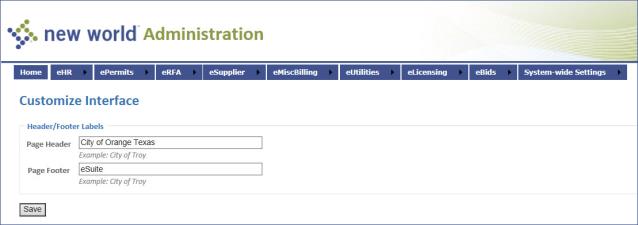
If you want to use a custom header on your pages, enter that value in the Page Header field. It will display at the top of each page in eSuite.
If you want to use a custom footer on your pages, enter that value in the Page Footer field. It will display at the bottom of each page in eSuite.
Click Save to use your custom header and footer.
The Administrator Accounts page provides a central location to create administrator accounts and maintain the modules they have access to. When you select the Administrator Accounts option on the System-wide Settings menu, you will see the following screen:
To edit an account, click User Name. To add an account, click Create New User. You will see the following screen:
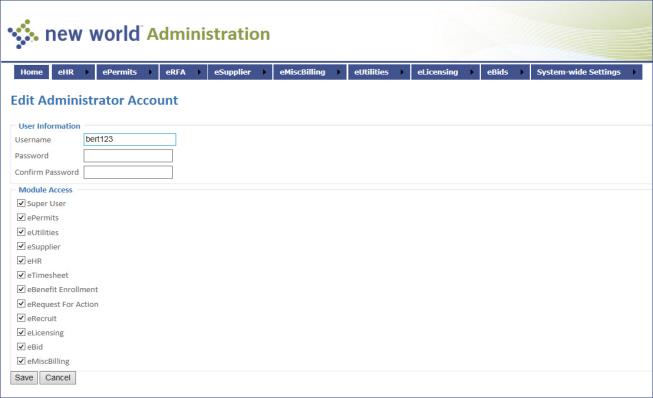
Enter the Username that this administrator will use to log into eSuite. This value is required; it must be at least 7 characters long.
Enter the Password the administrator will use to log into eSuite. This value is required; it must be at least 7 characters long. In Edit mode, leave this field blank unless you are changing the password.
Enter the Confirm Password. This value is required; it must be at least 7 characters long.
Note: When you edit an account, if you do not want to change the password, leave those fields blank.
Select the modules to which this administrator should have access. An administrator can also be designated as a super user, an administrator who has the ability to create other administrator accounts.
Click Save to save the account.